Shading
Shading options are used to specify how to shade each
area of the
map. If an
area on the
map has a value (for the selected data field) then it will be shaded. This value is then used to determine the
colour in which to shade the
area. The value is matched to a specific segment which has a unique
colour.
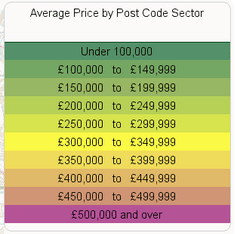
The segments are shown in the legend.
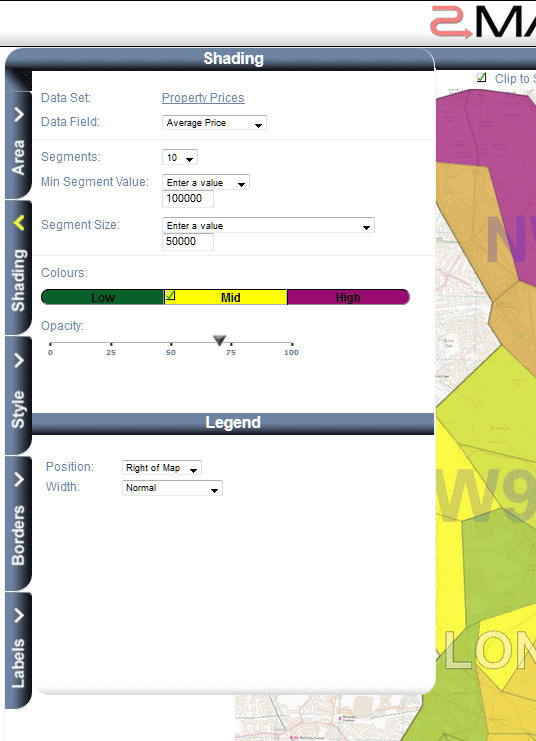
- Data set
- The dataset on which this map is based
- Data field
- The field within the dataset which is used to shade the map
- Segments
- The number of different segments that a map area could be shaded - this is the number that will appear in the legend.
- Minimum Segment Value
- The lowest value for the first/lowest segment. This can either be zero, the lowest value in the data or you can specify a value. If you specify a value that is higher than the lowest value in the data then an extra segment is created called 'Under X'. Where X is the value that you specified. This segment contains any values that are lower than your specified minumum.
- Segment Size
- You can enter your own segment size or have it calculated for you.
- Maximum Segment Value
- This is only visible if Segment Size = 'Calculate Automatically'.
You can choose from the following options:
- Highest in all the data
- Determine the maximum value for the data field within the entire data set and use that as the maximum segment value.
- Highest value (for the clipped area)
- Use the maximum value found in the data set for the area that is selected (and clipped) and use that as the maximum segment value. Warning! - As you change the selected area, the segment ranges will change, which prevents comparison between them.
- Enter a value
- You can enter a value here. This is useful for showing round numbers for the segments. If the value entered is less than the highest in the data then an extra segment 'Over Y' is added - where Y is the highest value in the data.
- 100%
- Use 100 as the maximum as the values plotted are percentages
- Colours
-
 The colour of each segment/category will be automatically assigned from a range of colours that fall between the 'Low' colour and the 'High' colour. If a middle 'Mid' colour is selected, then the segments will be coloured as a gradient from the minimum colour to the middle colour, and then from the middle colour to the maximum colour.
To change a
colour simply click on the
colour swatch - then select a value from the
colour dialog.